If this hadn’t have been Part Three of a series of blogs, I would’ve entitled this one “Peel and Stick Wallpaper – Divorce Material!” Neither me or my husband had ever hung wallpaper before. Friends had told me in the past how easy it is to do. Turns out, they were lying.
I’m the kind of person that has very little patience at the best of times, but coupled with an 8ft piece of sticky acrylic I had even less! I’m really pleased with the end result (minus the few imperfections), but my advice is: if you’re a beginner to wallpapering, quit whilst you’re ahead and pay a professional to install it.
There are lots of custom mural printers out there, just do a Google search. I chose Pictorem (based in Canada) because their website was easy to use, and their prices were very competitive. They were also really helpful when I emailed them about the photo specs and quality needed. Our mural cost just over $300 for a 12ft x 8ft wall, but I had quotes at over $1000. I was really happy with the quality of Pictorem’s product, so would recommend them.
If you are a seasoned decorator or really want to have a go at installing it yourself, here are the steps to follow; (if you don’t, then you can skip over this part):
- Make sure the wall is clean, perfectly smooth, free from any nails, lumps or bumps. The Pictorem mural is fairly thick and textured like canvas so is quite forgiving, but it will show up some imperfections.
- Lay out the rolls of wallpaper flat for a few hours before installing to make sure they’re flat when you go to install them.
- Measure the width of either the left or right hand roll, whichever you want to start with it doesn’t matter which side, and subtract 1″. Then draw a perfectly level line on the wall from the edge of the wall where you’re going to install the first piece. This will be the position where you line up your first piece of wallpaper to. It’s very important that you get this perfectly level (use a plumb line or a spirit level) otherwise all your wallpaper will be at a slight angle. The 1″ subtracted from the width allows for a 1″ overhang at the edge of the wall so you can cut it perfectly to size. Chances are your walls won’t be perfectly straight or 90 degrees so this helps to make sure your mural goes right to the edges.
- Start sticking the first piece of wallpaper from the top by peeling back about 4″ of the backing paper. Again have an inch or two overlap at the ceiling, so you can trim it perfectly to size. Make sure the length aligns to the plumb line that you drew on the wall though. This means the top may not look perfectly symmetrical to the ceiling as the walls and ceilings may not be at a perfect 90 degrees. But aligning to the plumb line will make sure the wallpaper is hanging perfectly straight.
- When you have the first piece straight, continue peeling the backing paper off and rub the spatula over the top of the paper from the center outwards to remove any air bubbles.
 If you do get any stubborn air bubbles you can pop them with a pin, or just un-stick the paper a little to let the air out and try again.
 - After you’ve got the first piece installed, you need to line up the next piece. If it’s the center piece like ours, we drew another plumb line in the same way as before but instead of a 1″ overlap, we drew it to a 1/2″ overlap, which is what the manufacturer recommends. The strips of wallpaper actually overlap each other, but it’s not that obvious when you look at it. The most important piece of this step is to make sure the pattern matches perfectly and that the strip is perfectly straight again. The mistake we made was that even though the top of the paper looked perfectly aligned, when we got nearer the bottom, we’d obviously not got the strip perfectly level as the design started to misalign. Very frustrating for a couple of perfectionists!
- You repeat this last step until all your pieces are installed. You should have an inch or so overlap at all edges. You then simply take a spirit level or other straight edge and a knife and cut them away, leaving you with a perfect finish. Or if like us, you messed up, so instead you cover the edges with a small piece of trim!
The result was worth all the hassle, but at the time I wasn’t so sure. It’s definitely a two person job, and ideally at times, even a three person. The strips of wallpaper are really wide which made it difficult to handle. I think if they had been smaller it would’ve been easier.

I’m glad we did it though, and not just repaired and painted the wall or even installed shiplap. It was cheaper than re-skimming the wall, but definitely more difficult than installing shiplap. But now we have something unique that no one else has, and it’s completely personalized.
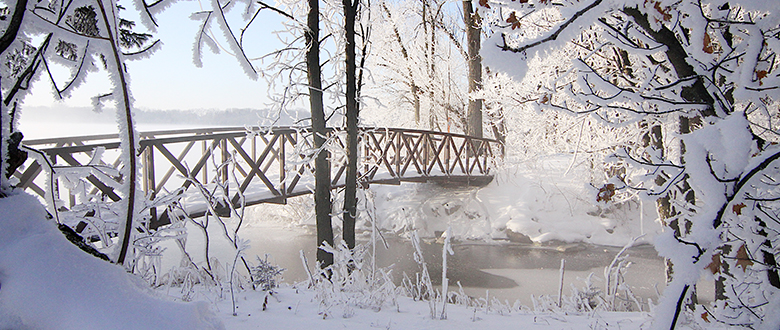
As I mentioned in my last blog, this photo we used was by a friend in our neighborhood Tammy Brice of Tammy Brice Creative. I saw it one morning on Facebook after driving past the exact same scene and not having time to stop and take a photo as we were late for work or something (as usual). The scene was breathtaking. As a mild climate native, I’d never seen ice on branches like that before and remarked to my husband as we drove past it how magical it looked especially with the mist over the lake. To me it epitomizes the beauty of Minnesota and the beauty of the place we call home – North Oaks. We feel blessed every time we look out of the window. And for me, my favorite time of year is winter here, and scenes like this are the reason why.
I hope this blog has inspired you to customize your space with something personal to you. It’s so inexpensive and easy to do (if you pay a professional to install it that is!) And I think the result is definitely worth it.
Thanks to Tammy for capturing the beauty of our neighborhood and allowing me to admire it all year round.
What will you do? Post your comments and photos below. I’d love to see others inspired to install something beautiful and personal in their homes.
Stay tuned for the grand reveal in Part Four of this series.
Thanks,
Jo
4 responses to “TV Room Make-Over: Part 3”
[…] got here, take a look back at my other blogs: TV Room Make-Over: Part 1, TV Room Make-Over: Part 2, TV Room Make-Over: Part 3. Once again, thanks to Tammy Brice from Tammy Brice Creative for the wall mural photo that really […]
jo, that would be fun to do a picture of the place in Italy where we looked over the vineyard every night at Sunset.
Hi Mary. Yes, you should try it! I’d love to see it! 🙂
[…] at a vinyl mural wallpaper that we had custom made for us, and well, you can read how that went here. However, if you are handy at installing wallpapers, here are a few of my […]